
Procedure:
1. Add the class diagram to the browser.
Open the previous Project model.
Add the student mark details then class diagram, under the use case
Realization in the browser then opens the diagram.
2. Add the classes to the diagram.
View the student mark details collaboration diagram to determine the classes to add
to the class diagram. Don’t include actors on your class diagram actors exist outside the
System.
3. Add associations.
Use case the collaboration diagram to determine the relationships between the
Classes.
Look at the object links and the direction of communication.From the diagram toolbar in the class diagram, check the unidirectional
Association and then drag the mouse from the sending class to the receiving
Class.
4. Add role names and multiplicity.
Double click the association draw between the entity class and the control
Class.
From the general tab type in the role A field and then click the role A
Detailed tab to add roles. A’s multiplicity from the multiplicity list, click 0..1
Click the role B detailed tab to add role b’s multiplicity from the
Multiplicity list, click 0.1
Try adding multiplicity between the boundary and control classes by right
Clicking the association.
Object
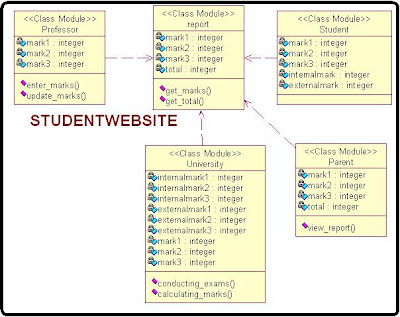
To create a class diagram to show the classes and relationships that participate in the
Basic flow of the student mark details use-case | CS1403- CASE TOOLS LAB.
Result:
Thus the class diagram to show the classes and relationship that participate in the
basic flow of the student mark detail use case.
1. Add the class diagram to the browser.
Open the previous Project model.
Add the student mark details then class diagram, under the use case
Realization in the browser then opens the diagram.
2. Add the classes to the diagram.
View the student mark details collaboration diagram to determine the classes to add
to the class diagram. Don’t include actors on your class diagram actors exist outside the
System.

3. Add associations.
Use case the collaboration diagram to determine the relationships between the
Classes.
Look at the object links and the direction of communication.From the diagram toolbar in the class diagram, check the unidirectional
Association and then drag the mouse from the sending class to the receiving
Class.
4. Add role names and multiplicity.
Double click the association draw between the entity class and the control
Class.
From the general tab type in the role A field and then click the role A
Detailed tab to add roles. A’s multiplicity from the multiplicity list, click 0..1
Click the role B detailed tab to add role b’s multiplicity from the
Multiplicity list, click 0.1
Try adding multiplicity between the boundary and control classes by right
Clicking the association.
Object
To create a class diagram to show the classes and relationships that participate in the
Basic flow of the student mark details use-case | CS1403- CASE TOOLS LAB.
Result:
Thus the class diagram to show the classes and relationship that participate in the
basic flow of the student mark detail use case.


